Monday, December 21, 2015

How To Make A Mixed Media Past Present and Future Personal Shrine For Journaling - #CoArtCo

Hi All, thanks for joining me in my studio.  Today's project is part of a collaboration with three other Colorado YouTube creatives.  Part 2 of the collaboration has us each making a unique and individual project with the goodie bags we received.  We each created a focal which measured no more than 4"x4" and then a goodie bag with inspiring bits and bobs.  It was so much fun to exchange with each other and see all the wonderful papers, fibers, buttons, gellie prints, mixed media painted paper, rhinestones, and on and on.  Everyone was so generous I have enough for about 15 projects!

You'll see in each of our videos how we transformed the three handmade focals we received.  From Pam Tanino I received a glittery green spinner, from Shemi a mixed media tile and from Ina a custom first name initial.  Brilliant!  I loved every piece.

With all of these lovely materials I made a personal (not necessarily religious) shrine for journaling.  This is meant to be a way to express your thought about your past, present and future.  Journal on custom made tags thoughts you have about events in your past that were wonderful experiences or that need forgiveness.  Keep what makes you strong from the past and release the rest.  Move to the present where you could journal about what you are grateful for or about those you love, just remember to "be present".  We all have dreams for the future, write yours down!  I hope you enjoy this unique way to journal.  See the tools and materials list below the video links.

See all of the videos at the links below.  As you move from one to the next, just click the first link and it will take you to the next video.


Pam Tanino:
https://www.youtube.com/watch?v=JS4-R--hV2Q&feature=youtu.be

Shemi Dixon:
https://www.youtube.com/watch?v=ZX537dSfAbQ

Ina Solsbery:
https://www.youtube.com/watch?v=7N1RILz1ZVE


Tools
Scissors
Craft knife
Ruler
Paint brushes

Materials
Various mixed media (paper, buttons, gellie prints, ribbon, lace, fibers, charms, napkins, printed words, quotes, sentiments, etc.)
Tags (optional) or other for journal cards
Box - open to three parts, you can alter a box to create a box that opens from the middle
Gesso
Various paints (optional)
Glue - matte medium, Mod Podge, PVA white glue
Masking tape
Inks pads (various colors)
Ink applicator


Monday, December 14, 2015

How to Make Polymer Clay Mini Mosaics #CoArtCo Collaboration with Shemi Dixon, Ina Solsbery and Pam Tanino

Subscribe to my YouTube Channel:  http://bit.ly/1Ny4aEY

Join me as I collaborate with three other fantastic Colorado YouTube artists.  We found each other through the YouTube Creative Arts Collaboration group and have met and enjoyed each other's company as we share our love of art and YouTube.  We're doing a collaboration where we each made a special, handmade item and a goodie bag of all kinds of materials for us to use in an upcoming project.   This first video shows how each of made the handmade item and the second video will show our final project.  My project is handmade polymer clay mini mosaics using acrylic paint, Pan Pastels and pearlescent powder.I hope you enjoy this collaboration.  See the links below to Shemi Dixon, Ina Solsberry and Pam Tanino videos.  See full tools and materials list for my project below the links.

Pam Tanino
https://www.youtube.com/watch?v=xX-_qssVvFg

Shemi Dixon
https://www.youtube.com/watch?v=m6em70yEgCA

Ina Solsberry
https://www.youtube.com/watch?v=DmRw1Dg7M7Y..


Tools
Oven
Pasta machine
Clay blade
Baking tile
Paint brush
Cutters - optional various sizes and types

Materials
Polymer clay - Premo! black and white, each tile takes approx. one block of clay
Pearlescent powder
Pan Pastel metallic or chalk pastels
Sealer - only if the piece will get some use/wear, otherwise not needed

Wednesday, December 9, 2015

#LoveWinterArt How to Make a Polymer Clay Santa's Reindeer Necklace

#LoveWinterArt  How to Make a Polymer Clay Santa's Reindeer Necklace.  Join me in my studio and learn to make a polymer clay holiday necklace with Rudolph the Red Nose Reindeer and Dasher and Dancer, Prancer and Vixen, Comet and Cupid, Donner and Blitzen, Santa's eight reindeer.  This polymer clay necklace is a fun way to wear the holidays.  Hope you enjoy and thanks for joining me in my studio.

Check out all the other great artists participating in the #LoveWinterArt - just search YouTube for the hashtag.

Subscribe to my Channel:  http://bit.ly/1Ny4aEY


Tools
Oven
Pasta machine
Jewelry pliers - chain nose
Cutters - round 1-1/2 and  1-1/4", various mini cutters 3/4" and 3/16" tear drop, 3/16" round, leaf cutter
Craft knife
Needle tool
Ball stylus
Extruder with medium round disk
Hollow bead maker or light bulb
Texture sheet or rough sandpaper

Materials
Clay - Premo! light blue, white, burnt umber, raw sienna, red, green, black
Genesis medium or liquid clay
Jump rings - 10mm and 5mm
Chain - approx 9"
Snowflake buttons - optional
Tiny jingle bells - optional
Toggle clasp


Facebook: https://www.facebook.com/maria.clark.18062
Pinterest: https://www.pinterest.com/SweetWillowDsgn/
Twitter:
https://twitter.com/search?q=SweetWillowDsgn
Blog:  http://www.sweetwillowdesigns.blogspot.com/

Monday, November 30, 2015

How to Make an Advent Charm Bracelet - Special Gift for a Christmas Baby

There's a Christmas baby due - our first grandchild.  To commemorate the event and to celebrate the Christmas season, I created an Advent Charm Bracelet for my Daughter, Emily.  Learn to make this simple bracelet with various charms and green/red holiday clusters.  Use simple jewelry making tools and materials to create the bracelet and I'll also show you how to turn a dollar store holiday tin into a personalized jewelry box to keep all the charms in.  Your loved one can open a mini package for each day leading up to Christmas and add the charm to the bracelet.  Usually there are 24 surprises in a traditional Advent calendar but in this one I added the 25th as a special charm for the baby.

You can use these techniques to make a charm bracelet to count down for any special event.  This would make a really nice gift.  Hope you enjoy and thank you for joining me in my studio.


Tools

Nail - choose a size comparable to the size of the knob
Hammer
Screw Driver
Stamps - number or use number sticker s
Jewelry pliers - round and chain nose
Wire cutter
Paper punch - round or ribbon type

Materials
Tin - the size I used was approx 5" long, 4"deep and 4" wide
Mini envelopes
Charm bracelet blank
Various charms
Glass beads - green leaves, 4mm red faceted
Ribbon (to tie the envelopes closed) or could use Washi tape
Head pins - 4 per cluster
Spring rings - 1 ea for each charm and cluster
Stamping ink
Jump rings - may or may not need if the charms come with them, otherwise 1 ea per charm
Clear Command mini hooks (Optional, I used them to hold the bracelet to the top of the box
Sharpie - gold metallic

Saturday, November 28, 2015

Announcing: Try It Once Series - Doodle and Collage Mini Messenger Bags


I love all kinds of arts and crafts and have tried so many different techniques over the years.  Scrapbooking - Yep.  Painting - Yep.  Jewelry Making - Yep.  Mixed Media - Yep.  Crochet, knitting, weaving - Yep.  Sewing - Yep.  Jewelry making, metalsmithing, beading - Yep.  I enjoy working with all materials and am always on the lookout for cool new art and craft products.  Some of the things I've tried, I do over and over again.  Some are a one time thing.  So, I'm starting a series called "Try It Once" where I'll try out new )to me) or rediscovered techniques.  Some I'll use over and over again, some will be a one time thing.

In the first two projects in the series we'll use doodling and collaging techniques to create custom, personalized mini messenger bags.  I was inspired by all of the collage and art journaling YouTube videos made by my fellow Creative Art Collaboration members (hey Shemi and Ina) who do so much great mixed media, collage and journaling.  I knew I would love to explore making colorful art works but didn't know what I would do with all the paper I would end up with.  So, in keeping with my mission to create wearable art, I took the techniques and applied them to something to wear!

Learn to doodle and collage these fun bags that can be used as a mini purse, cell phone bag or gift bag.  This would be a fun project for kids as all of the materials are simple and readily available.  Use painters tape, acrylic vinyl/leather paint, and fabric paints to create a splashy and bright background along with clear stamps, Sharpies and paper to doodle and collage these personalized wearable art bags.  Find the tools and materials list below the video links.

Hope you enjoy and thanks for joining me in my studio.  If you enjoyed this video, please consider giving it a thumbs up and subscribing to my channel.  I'd also love hearing from you in the comments.  Thanks for your support, take care.


Tools
Scissors
Paint brush

Materials
Mini messenger bag - Dollar Tree
Paint - acrylic vinyl/leather paint (Leather Studio - Leather & Vinyl brand by Plaid), acrylic (Golden Gold Fine)
Fabric paint - sprays, dimensional (Tulip Sprays and Metallic Dimensional fabric paints)
Paper scraps - scrapbooking paper and printed tissue paper
Mod Podge for Fabric
Stencil
Tape - low tack such as blue painters tape
Sponge - cosmetic sponge or can use paint brushes
Pitt Big Brush - Burnt Umber
Sharpies - various colors (black, magenta, blue, red)

Sunday, November 15, 2015

SWD How to Make a Custom Display Box Collaboration with Cheryl Row


Thanks for joining me in this video as I take Sweet Willow Designs on the road for a collaboration with Cheryl Row, a quilt and fabric artist and fellow member of the Mile High Polymer Clay Guild.  Since our guild does regular themed swaps, we talked about ways to display and enjoy these mini art pieces.

Our collaboration shows several ways to display your small art objects using re-purposed wooden items, fabric, paper and paint to create a special, customized display.

It was great to be with Cheryl in her home studio where she creates her polymer clay art, remarkable quilts, aprons and home decor items.  Such a treat.

I hope you enjoy this video and use some of the ideas to display your pieces and not keep them in a wrinkled brown paper bag!  As always, I appreciate your comments.  If you enjoyed this video, consider giving it a thumbs up and subscribing to my channel.  Thanks for your support, take care.


Subscribe to my Channel:  http://bit.ly/1Ny4aEY
Contact Cheryl Row, Designs by Cher, at:
rowcheron@msn.com

Facebook: https://www.facebook.com/SweetWillowDsgn

Pinterest: https://www.pinterest.com/SweetWillowDsgn/

Twitter:
https://twitter.com/search?q=SweetWillowDsgn

Blog:  http://www.sweetwillowdesigns.blogspot.com/

Thursday, November 12, 2015

#Thankful4Art Give Thanks Polymer Clay Placecards

Hi All, thanks for joining me in my studio for the #Thankful4Art YouTube Creative Arts Collaboration event.  I have a project to make a polymer clay "Give Thanks" placecard for your holiday table.  This unique placecard not only creates beautiful placecard settings for each guest, it also allows your guest to write down what they are thankful for.

This not only makes a nice table setting but also a keepsake for each of your guests if you wish.

We'll use basic polymer clay techniques and tools.  You don't need to have all the cutters, you can freehand the leaves and other design elements.

I hope you enjoy this project.

P.S.  I'm using some new video techniques including more music and close up shots of the project details.  Let me know how you enjoy these new features.


Wednesday, November 4, 2015

Learn to Make a Customized Business Card Case

Hi All, welcome to my studio.  In this project we'll make a customized business card case.  This is a great way to make a unique and fun accessory to show off your personality and keep your business cards pristine.

Since I make YouTube videos and I have my first artist business cards, I thought I'd make a really customized card holder by taking my YouTube thumbnails and making a one of a kind paper to make my case out of.  To make the paper, I brought my thumbnails into MSWord and sized them randomly from 1/2" - 1" and then just copied them in a collage like way across the 6" x 6" size I needed for the card case.  I used some YouTube logos and the YouTube Creative Art Collaboration group I belong to (credit to Chuck Carson for the CAC logo).  It was so nice to celebrate my channel by making this customized piece.  I'm headed to the YouTube Creator's Day in Boulder, CO in a week or so and it will be fun to pull out this card case that celebrates my YouTube videos as I hand out my business card to other content creators.  Very thrilling.

Here's the video.  Check out the tools/materials list below the video and download the template.  I hope you enjoy this project.


Tools
Scissors
Score tool
If you want to customize for your YouTube Channel you'll need:
  • Computer
  • Word processing program
  • Printer
Materials
Paper - 6" x 6" scrapbook, card stock or other
Customized paper:
  • Glossy photo paper
Embellishments - to decorate use buttons, washi tape, fabric tape, ribbon, etc.
Tape - sticky tape with red backing or other strong tape
Velcro tabs - mini clear


Sunday, October 25, 2015

SWD Learn to make a Dollar Store Halloween Skeleton Necklace

Hi All,

Join me in my studio to make this fun Halloween Skeleton Necklace.  I had bought a couple of the $1 skeleton garlands at my local Dollar Tree a while ago.  I hope they still have some of these this year, it's kind of close to Halloween and I notice everything is turning over for Christmas.  If they don't have them, save this for next year.  It's a great, inexpensive Halloween project and simple enough for the kids.  I made this for an elementary school teacher and I think it will be a great hit with her class.

We'll use very basic tools and materials such as wire, jump rings, chain, jewelry making pliers and wire snips.  If you want a more temporary necklace use the jute string that comes with the skeleton garland in place of the wire and chain.  You can simply tie a knot to wear the necklace.  The full tools/materials list is below the video.  If you enjoyed this project, I hope you'll let me know by subscribing to my YouTube channel, giving me a thumbs up (always encouraging) or leave a comment.  I hope you enjoy.


Tools
Jewelry pliers - two chain nose
Wire cutters

Materials
Skeletons - I used the skeleton garlands from Dollar Tree, if you don't find these, look for something similar; make sure they're flexible and a good size for a necklace - not too big
Jump rings - 2ea 10mm
Craft wire - 22ga approx 2'
Pumpkin bell or other pumpkin you can attach to represent a trick or treat bag (optional)
Chain - 2ea 6" lengths
Clasp - toggle or other

Monday, October 19, 2015

SWD Polymer Clay Three Rose Necklace Tutorial

Hi All, welcome to my studio.  In today's tutorial, we'll make a polymer clay three rose necklace.  This necklace can be customized to be a family or commemorative necklace to represent your children or grandchildren, marriage or a departed friend or family member.  It's a sweet reminder of your loved ones.  This would make a great gift for a mother-in-law or grandma.  Hope you enjoy this video tutorial.  See the tools and materials list below the video.


Tools
Oven
Pasta Machine
Jewelry pliers
Craft knife
Needle tool
Paint brush or sponge
Hand drill
Paper template - see shape in video - 1.5" length x 3/4" width

Materials
Polymer clay - I used Premo! Sculpey in Spanish Olive for the leaves and a mix of Magenta and Pearl for the roses (the leaves were rolled on the thickest setting of my Atlas pasta machine, the backing sheet was rolled at #3.
Genesis Medium, Liquid clay or Bake 'n Bond
Sandpaper - 30-40 grit
Paint - Burnt Umber
Jump rings - 6mm approx or size to fit
Chain - 2 8" lengths
Clasp
Paper towel

Tuesday, September 22, 2015

Learn to Upcycle an Old Leather Belt into a Bracelet cuff

Hi All.  Join me in my studio as we upcycle a thrift store leather belt into a fabulous fall inspired bracelet cuff.  Learn to cut the belt, add snaps, paint and finish your cuff.  See the tools/materials list below the video link. Hope you enjoy.


Tools
Leather hole punch or nail
Snap setter
Hammer
Utility knife
Paint brush
Pen or Sharpie

Materials
Old leather belt
Snaps - I used Tandy Line 20
Paint - compatible with leather
Fingernail polish - acetone
Cosmetic sponge
Cotton wipe

Wednesday, September 16, 2015

#LoveFallArt - SWD Polymer Clay Fall Tree Mixed Media Panel

Hi All, I tried something new by making a polymer clay fall tree mixed media panel.  I've never done any kind of polymer clay wall art so I thought I would stretch creatively to meet the YouTube Creative Arts Collaboration theme for September - #LoveFallArt.  The colors in the panel are beautiful fall colors with a stylized tree which has dropped its leaves.

In this tutorial I show you what can go wrong in the studio and how to fix it.  Because I'm inexperienced in doing this type of art, I used the wrong kind of panel.  What a disaster but there's very little that can't be saved if you're willing to keep trying.  Plus you'll know what not to do next time!  LOL  I hope you enjoy this project.  You'll find the tools and materials list following the video.  Leave me a comment or ask questions, I really love hearing from you.  Thanks for joining me in my studio.


Tools
Oven
Pasta machine
Acrylic roller
Clay blade
Craft knife
Paint brush - for paint and sealer
Sponge brush (optional)


Materials
Clay - scrap in tan/brown, blue and green/red/orange families
Weldbond or liquid polymer clay
Masonite or other oven safe board
Burnt Umber acrylic paint
Sandpaper - 320 grit
Sealer - Future floor wax, Varathane or other


Thursday, August 20, 2015

#pawgustart - SWD Polymer Clay Tutorial - Birdcage Necklace

Here’s a fun project using an embossing folder that scrapbookers and mixed media artists use.  The design is by Darice and it has 5 different birdcage designs.  I loved the design and since it has birds, it fits the theme for this month’s YouTube Creative Arts Collaboration event.  Go on YouTube and search for #pawgustart to see all the videos by the over 300 artists in the group.

In this project we’ll make a birdcage necklace using polymer clay.  We’ll make bead dangles to enhance the design and basic jewelry making tools and materials.  Right after the video is the tools/materials list.  Hope you enjoy this project.

 
Tools
Pasta machine
Acrylic rod
Embossing folder – Darice Birdcage
Craft knife
Baking tile
Oven
Jewelry pliers
Paint brush
Sanding container
Drill or needle tool – drill bit size to fit jump rings

Materials
Polymer clay – just over half block of Sculpey Premo! silver or clay of your choice, just make sure it’s strong enough for jewelry
Paint – black
Sandpaper – 240 and 400 grit wet/dry
Beads – jet black briolette beads – large 8 ea, small 16 ea
Bead caps to fit briolette – 24 ea
Jump rings – 18 ea - 6mm (approx.); 8 ea – 3mm (approx.)
Head pins – 24 ea
Varathane or other gloss sealer – optional
Chain – 7” (approx.)

Clasp – toggle or other

Wednesday, August 5, 2015

Polymer Clay Birdhouse with Gnome

My first attempt to cover wood with polymer clay and my first sculpted figure.

A co-worker had made birdhouses from reclaimed wood and offered a couple of them.  He has a love of garden gnomes so in exchange, I created this fanciful piece with a purple roof, grass, flowers, a blue bird and of course, the garden gnome.


Turned out great.  Here's the pictures.


Tuesday, July 28, 2015

SWD - Oh No! I Burned my Clay. Can this piece be saved?

In the last video series I created a tassel pendant.  The ones you see are not my first attempts.  I originally planned a bright, summery pendant with bright yellow, orange and purple.  Almost a retro look.  Unfortunately, because the clay covering is relatively thin, I burned and scorched the clay.  The result was a sad, dark mess.  The piece was destined for the trash but really, with the time I put into creating it, and the fact that I liked the shape, I decided to see what I could do to save it.  So, I used bronze, heavy body paint, I antiqued it and added a bunch of Swarovski crystals for some bling. Added a gold tassel, and I'm happy with the result.  So, see what you can do to save those not so perfect pieces.  Here's the video on the process. Have you ever burned a piece?  What did you do?  Let me know in the comments.  Hope you enjoy the video.

Saturday, July 18, 2015

#lovesummerart SWD Polymer Clay Tassel Pendant Tutorial

There’s something exciting happening in the YouTube art community.  Over 250 YouTube art/craft/how to channels have formed a community!  Thanks to Cinammon Cooney (theartsherpa), Clive Powell (clive5art), Sigrid Soto (secretsoto) and Ginger Cook (gingercooklive) for getting the group started.  This should be a fun collaboration and a supportive group.  I hope you visit the Facebook page to connect with the content creators participating.

My entry is a series of three videos on how to make a polymer clay tassel pendant.  I’ll show you how to create the pendant, make the tassel and do finishing work so you have a wearable work of art.  I hope you enjoy my entry and use the #lovesummerart (same hash tag on Facebook) to see of all of the unique and interesting videos showcased by these talented artists.   See below the videos for the tools and materials list.

Here are the tools and materials for my project.

Tools
Drill or needle tool
Craft knife
Clay blade
Oven
Pasta machine or roller
Texture plate
Scissors
Old credit card, hotel card key or several pieces of card stock
Double sided tape
Jewelry pliers - Round and flat nose

Materials
Polymer clay – navy (cobalt + black)
Thread for tassel – Artiste nylon thread #2, crochet thread or other
Pen barrel (optional), you could make your own from polymer clay
Viva Décor Inka Gold or pearlescent powder
Wire – 20 ga
Jump ring 6mm
Necklace finding – can be rope or chain
Bead cap (optional)
White glue or Fray Check (optional) - the thread will fray or unravel with wear, use one of these to stop the fray unless you like the look, apply a little bit to the end of each cord, separate and let dry

Wednesday, April 22, 2015

Featured on Totally Tutorials - Custom Jewelry Display Stands

http://www.sweetwillowdesigns.blogspot.com/2015/04/make-your-own-custom-jewelry-display.html


I submitted my tutorial for custom jewelry display stands to the Totally Tutorials site and they published it on April 20!  Check out their site for great tutorials of all sorts.

Friday, April 17, 2015

SWD Interview: Lyn Parker Gil of LynzCraftz

Hi everyone, thanks for joining me today as I interview a fellow artist and YouTuber, Lyn of LynzCraftz.  I started following Lyn’s YouTube channel in the past year and have greatly enjoyed her polymer clay tutorials.  With over 5,000 subscribers to her YouTube channel, Lyn is plenty busy creating and sharing.  Hi, Lyn, welcome to Sweet Willow Designs.
Would introduce yourself, tell us a little about yourself and your interests outside of your work as an artist.
Married 30 yrs to my high school sweetheart... mother & grandmother, I've been a crafter since I can remember. My mother, a crafter herself, enrolled me in my first art lessons at 6yrs old (she didn't realize it was an oil painting class no less). I've been lost in the creative ocean ever since.

I believe inspiration can come from almost anywhere...so I am an observer of life constantly looking for that inspirational moment. Whether from the Oak forest that surrounds our home or from my time traveling work desk or maybe even a history documentary my inspiration is as widespread as my imagination. I hope you will see something that catches your eye or maybe even your imagination...inspiration is everywhere!  


251.jpg


You’re an accomplished polymer clay artist.  How did you get started with polymer clay?

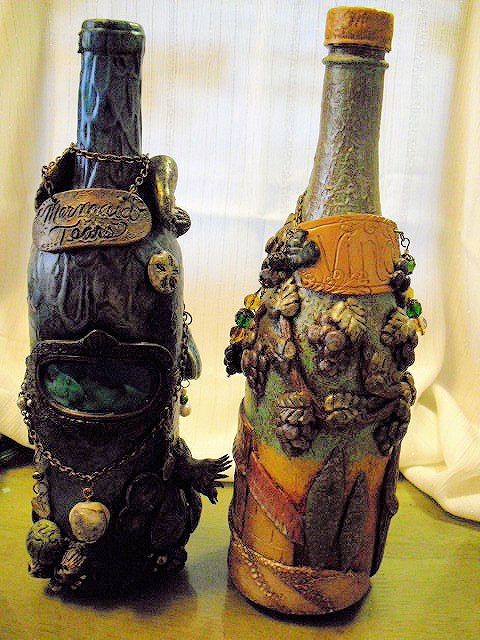
I first picked up polymer clay about 20 years ago, some Super Sculpey but I only fiddled around with it. Then about 10 years ago I began sculpting some heads for some of my cloth dolls but again I only made a few. Then I began sculpting Mermaids & Fairies, which I still enjoy but switched to jewelry shortly thereafter.


012.JPG


Do you work in any other mediums besides polymer clay?

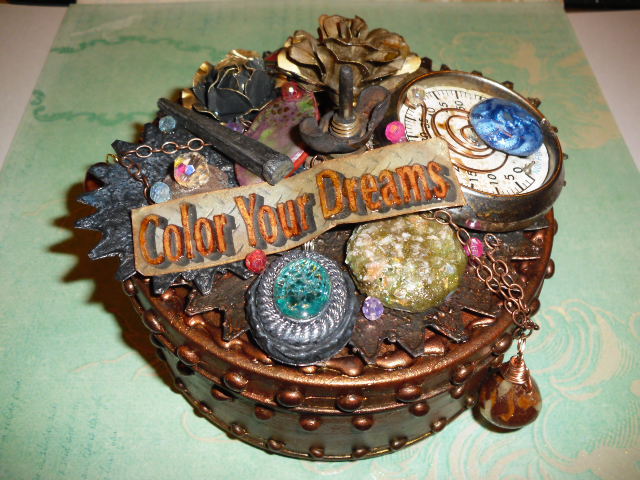
Yes, I enjoy Mixed Media, Altered Art, Sewing, Cloth Dolls,Painting, Drawing & Resin...I have to try it all!


Lyn, you have close to 350 videos on YouTube.  How did you get started and how long have you been creating videos?

I’ve been watching YouTube videos since 2011 & while watching one day I decided to give one of the projects a try. I was encouraged by friends & family to show what I had done but I really didn’t like the sound of my own voice. I just created a slide show type video at first. When I became comfortable with it I went to actually speaking in the video & the rest is history.
340.jpg

How do you decide what to make and how do you come up with your beautiful designs?

I get inspiration from almost everywhere...movies, old photos, old magazines & even vintage master jewelry artists. My mind is rarely quiet & I often work out my designs in my sleep...well that few moments before sleep anyway.

How much time do you spend creating each week and what’s your typical day like?

I’m up almost every day at 6AM & in my studio by 7-7:30 when my Hubby leaves for work. I take a break for lunch but other than that I’m in my studio till 5:30 & sometimes longer. My studio is also my office though so I also run my shop from there.I try to take Friday’s off for chores & down time.

What is your workspace/studio like?

My studio is in one of the spare rooms, a 14x14. It’s full to the brim with all my supplies for clay & mixed media. I have a separate room for my sewing. I have one wall that I call my “Wall of Inspiration” where I have pieces I’ve created that are special to me. It’s not really decorated in any way other than a few piece made by friends.
What are your favorite tools?

I’ve said this before...my hands are my favorite tool. I can do more with them than any other tool. But if I had to choose an actual tool I’d have to say my metal knitting needle & my Color Shaper(silicone rubber tipped tool).
I know you have an Etsy shop.  How long have you been selling your creations and how did you get started?

It was just a year ago in November when I finally open my Etsy shop. I definitely waited much too long...I should have listened to my Hubby & done it before then. You have to be at a place in your life where you feel comfortable with your art. It also helps to get everything together like your packaging, business cards( I enclose one in every purchase), etc.


Do you have any advice for artists wanting to get started with YouTube or selling their work?

Start slow. Know yourself & what your style is...if you like a certain type of art & find yourself drawn to it...do it! You’ll always be more creative in a style you enjoy. For instance I don’t do caning...it’s just not something I’m interested in. I’m more into grungy metal & natural textures. If you know your own style & like it...more than likely someone else will too.
Lyn, wow.  Thanks so much for joining me today.  Great advice to the artists wanting to sell their work or create videos. I’ve had a great time getting to know you better. How can my readers find you on Facebook, Pinterest, etc.?
I’d love to have your readers stop by and say hi.  Here’s how to find me.
Blog:          http://lynzcraftz.blogspot.com/
Google+:   https://plus.google.com/108220717082799436253/posts
Etsy:          https://www.etsy.com/shop/LynzCraftz
Thanks again Lyn.  I hope you all enjoyed this interview with Lyn of LynzCraftz.  Leave a comment below if you’d like to see more interviews, have a question or want to leave your thoughts on this interview.  As always, thanks for joining me in my studio.

Tuesday, April 7, 2015

Make Your Own Custom Jewelry Display Stands

Here's a quick, easy and inexpensive project to make your own necklace and earring display stands.  I needed a way to take my jewelry pieces to workshops and to use as props for photos and wanted a custom look so I designed these unique jewelry stands.  I love the way they look and how easily you can customize with paint or scrapbook paper.  Using scrapbook paper gives endless options for color and pattern.  Make sure the pattern you choose doesn't compete with your jewelry!

Here's the link to my YouTube video for this project.  There's a bonus in the video to adapt this to an earring stand and a gallery of finished display stands.  The materials and tools are listed after the video.  Hope you enjoy.  Don't forget to subscribe, like or comment if you enjoyed this video and want to see more.  Thanks for joining me in my studio!


Blue acrylic paint and vintage look scrapbook paper.


Burnt Umber acrylic paint and wood grain patterned scrapbook paper.


Gold acrylic paint and patterned scrapbook paper.


Here's the stand adapted for earrings.  Great way to display all those wonderful earrings.


Materials
Wood
·   Balsa shapes – oval (2.8” x 4.3”), rectangle (3.5” x 4.5”)
·   Doll head/knob – 1-1/4”
Acrylic paint
Paint brush or sponge brush
Sandpaper (I used 240 grit)
Craft knife
Paper towels
Wood or strong craft glue
Sealer (optional to add sheen and protect surface - I used Mod Podge)
Binder clip

Optional Decoupage
Scrapbook paper
Scissors
Mod Podge or other decoupage medium
Applicator – paint brush or sponge brush

Tools
Craft knife
Scissors (optional if decoupaging)

Drill (optional if making earring stand) can be electric or hand with small drill bit just large enough to accommodate earring findings

Friday, March 20, 2015

Build A Line Challenge from B'Sue Boutiques, Maria Clark of Sweet Willow Designs, Part 3 - The Final Reveal!


Welcome to Part 3 of the B’Sue Build a Line Challenge hosted by Brenda Sue Lansdowne of B’Sue Boutiques. The essence of the challenge was to create a jewelry line based on an original concept using B'Sue components.  The challenge was to develop a cohesive line based on a unique theme with a minimum of five pieces. 


I have to tell you that going in five pieces seemed like a piece of cake.  Five isn't so many after all. Like several of the other artists participating in the challenge, I had to overcome creative blocks and being overwhelmed with too many ideas and nowhere to start.  Here are the components I started with.  You can imagine how necessary it was to settle on a few elements.

Thankfully the inspiration of the group, particularly the local Denver group, helped me overcome these roadblocks and I completed my five pieces.  I'm pleased with the results.
My concept was to use polymer clay to create faux soutache combined with brass elements from B'Sue Boutiques.  Soutache is a traditional fiber arts technique that uses colorful braided cords to make intricate and fluid jewelry designs.  I’ve interpreted the soutache in polymer clay which offers endless options for color and design.  My five pieces include two bracelets, a pendant and two pairs of earrings.


In this first set I used an ornate brass frame and flowers with deep merlot, pink and blush polymer clay custom mixed colors accented with glass pearls.  This set includes a pendant with a 27" chain and earrings with the brass flowers which I cut down and used as accents.

Experimenting with a two tone effect on the brass gave an interesting twist to the design.  The raw brass frame was colored with Gilders Paste in silver.  All of these pieces were sealed to preserve the patina and highlight the clay.

I tend to design in a free form manner with little sketching up front which adds an element of surprise but can be difficult to reproduce.  In the future, I'll try sketching in advance.


The second set used the same brass ornate frame and flowers to keep the line cohesive but in this interpretation I used vintage style silver buttons and metallic cuffs that I made myself from faux leather trim.  The set includes two bracelets and a pair of earrings.

I really liked the way these turned out, the use of the buttons adds interest and design and the faux leather gives a nice glow to the brass and enhances the overall look.  To me this has a Southwestern look with the turquoise, gold and purple clay (hard to see the purple, kind of reads black).

There's a lot more to building a line than just designing pieces of jewelry.  Pricing, branding, watching trends, tiers, selling, inventory management, taking pictures and all the business management tasks that go into a jewelry business have to be mastered for ultimate success.  The class was exceptional in that each of these issues were addressed and participants had an opportunity to weigh in with their thoughts, challenges and strategies.  This was a great learning and sharing experience.

I met two of my goals for the year which was to participate in more challenges and to stretch creatively.  Goals I didn't know I had were to find a community of artists with similar goals and to share, share, share and to make more use of social media.  These goals, while not initially identified by me, were brought to light during this challenge.  That's a great side benefit!  Finally, I challenged myself to try something new and learn new skills.  What a great experience!

You will be amazed at how unique each of the participating artists are and how they went about realizing their vision.  Each had struggles and successes which they share in their blog posts.  The energy and effort each put into the challenge will be revealed as they showcase their lines.  Thanks to Brenda Sue who mentored the class.  It's clear how much of a commitment this was for her and how much energy and passion she put into the process.  A big thanks to her and all the artists!

Please take a look at the other fantastic artists participating in the challenge by visiting their blogs below.


Brenda Sue Lansdowne, B'sue Boutiques

Marcia Tuzzolino

Jann Tague

Judy King

Linzi Alford

Cynthia Wainscott

Carole Carlson

Lynn Stinten

Marica Zammit

Catherine Shattuck

Michaele Collie

Mary Craig

Lee Koopman

Erin Whitacre

Monica Casady

Leila West

Cindy Peterson

Leila Belcher

Gloria Allen

Pamela Anger

Tammy Adams

Lynda O'Mara

Elizabeth Hildreth

Dana Hickey

Janet Calardo

Maria Clark

Lori Beekman

Jennifer Kroeger

Amy Jorgensen

Robin Reed

Ingrid Anderson

Louise O'Shields

Susan Killam

Mary Katherine Deis

Nike Bottalico

Susan Bowerman

Kristy Le

Jan Peters

Mitzie Crider

Gina Hockett

Linda Anderson

Alexandra Sefton

Melida Boman

Teresa Shurter

Melissa Latimer

Renee Hong

Nadine Edris

Lori Meyer

Jennifer Merrill Williams

Denise Lussier Poirier

Renee Allen

Autumn Adams

Elizabeth Owens

Kat BarronMiller

Sandra Ballard

Coral Law